Ask the Expert Series: Walk-In Showers Part 2- Shower Walls and Enclosures
Welcome back! This is Part 2 in our walk-in shower blog series, where we’re breaking down the must-know components of a functional and fabulous shower stall. In Part 1, we covered the unsung hero—the shower pan. Today, we're moving up the wall—literally. Your shower walls are more than just a backdrop; they’re the key to water resistance, ease of maintenance, and visual impact. Whether you're in Plainville, CT or anywhere in the state looking to upgrade, we’ll help you figure out which wall material makes sense for your home, your budget, and your vibe.
And spoiler alert: In Part 3, we’ll explore shower doors and enclosures—frameless, sliding, privacy glass, and more. But for now, let’s dig into walls.
🧱 Behind the Tile: How Shower Walls are Built
Let’s break down how shower walls become permanent fixtures in your bathroom. Whether you’re working with acrylic, tile, or solid surface panels, the installation always starts with your home’s framing and wall substrate.
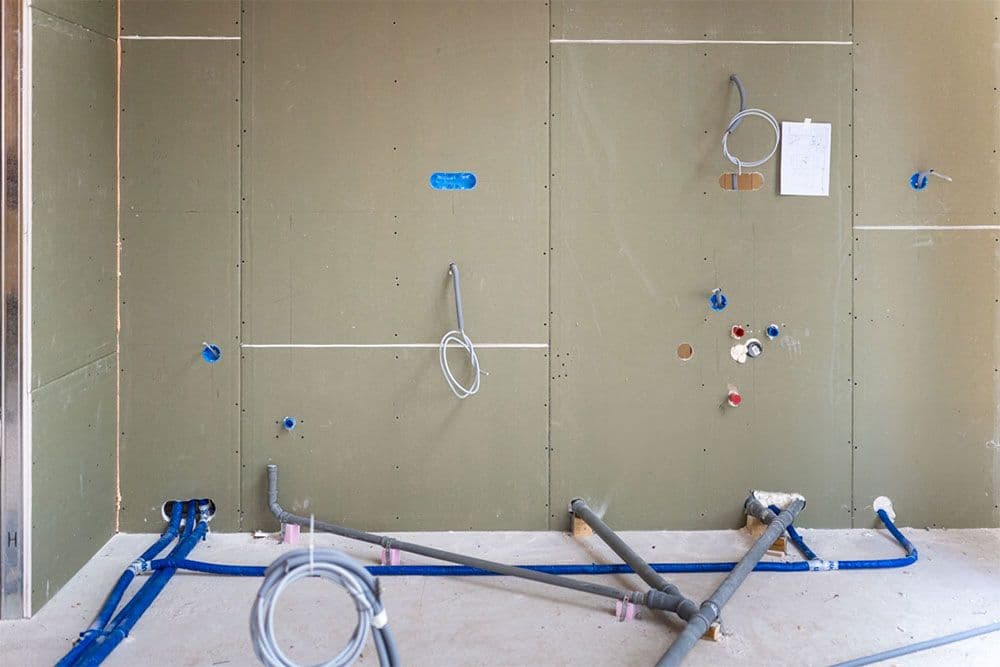
Step 1: Stud Framing & Wall Cavity Inspection
Shower walls are secured directly to the framing of your home, specifically the vertical studs behind your drywall become the foundation of your shower walls. In most CT homes, especially in older builds around Plainville or New Britain, the spacing between studs is 16 inches on center.
During a remodel, we strip the existing wall materials down to these studs and inspect for:
- Moisture damage
- Rot or mold
- Poor prior construction or plumbing placement
The most common issues we see are improperly sloped backer boards or missing vapor barriers—problems that can turn into thousands of dollars in repairs if not caught early.
Once the framing is verified as clean and level, we move forward with waterproofing and panel or tile installation.
Step 2. Moisture Barrier or Waterproof Backer Board
Once the wall framing is sound, we install a waterproof layer to keep moisture from getting into the structure of your home.
Depending on the wall material you choose, this waterproofing layer could include:
- Cement board (like HardieBacker) for tile installs (that still need to be waterproofed- see our tile section below)
- Waterproof foam board systems (like Wedi or Kerdi)
- PVC moisture barriers behind acrylic panels
- Liquid-applied membranes (rolled or sprayed on)
This waterproofing step is critical. It's what keeps your beautiful new shower from turning into a hidden mold farm six months later.
Down to the studs? But Wait—What About 1-Day Installs?
Good news: Not every shower wall remodel requires full demo down to the studs.
If your existing walls are structurally sound and mold-free, we can install acrylic or solid surface panels directly over them. This is especially common in one-day remodels, which are a great fit for homeowners who want a fast, mess-free solution without compromising on quality.
Here’s how it works:
- We inspect the current surround for water damage, movement, or surface irregularities.
- If everything checks out, we clean and prep the existing wall surface.
- Then we install custom-fit wall panels over the existing structure using industrial-grade adhesives.
- All seams are sealed with mildew-resistant silicone, and transitions are finished with integrated trim pieces for a watertight fit.
This approach skips the tear-out phase completely and saves time, labor, and cost. It’s also a great option for older homes with plaster or tiled walls that would otherwise require a full reframe.
Who is it for?
- Homeowners looking to upgrade a dated tub or fiberglass surround
- Folks on a budget or tight timeline
- Projects where plumbing and layout stay exactly the same
Who should skip it?
- Homes with water damage, mold, or framing issues
- Layout changes (like moving fixtures or enlarging the shower)
- Tile installs—these still require full wall prep and waterproofing
Total Bath Systems Tip:
We evaluate every bathroom on-site. If your existing walls are eligible for an over-the-top panel system, we’ll let you know—and we can usually finish the whole job in just one day.
The Different Wall Systems
Acrylic Shower Walls – The Practical Pick
Now that we’ve taken a quick look behind the walls Let’s focus on the MVP of modern remodels: acrylic wall panels.
These are large, pre-fabricated panels made from high-quality acrylic, often reinforced with fiberglass. They're sleek, mold-resistant, and wipe clean in seconds. No grout lines, no scrubbing.
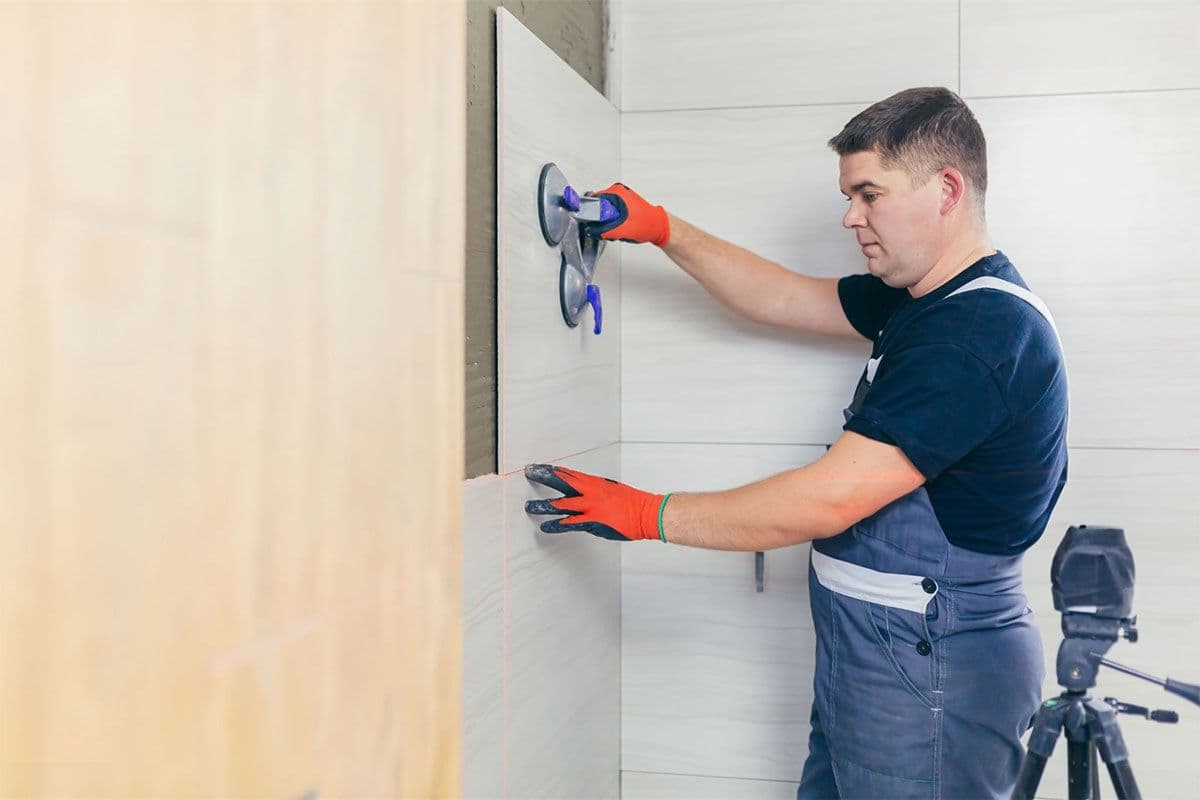
For these smooth, seamless wall systems, installation is surprisingly quick but still technical.
Here’s how it works:
- Panels: The panels are custom-measured and trimmed to fit the exact size of your shower stall.
- Fixture Openings: Acrylic panels must be carefully cut with hole saws or oscillating tools to accommodate shower valves, diverters, and showerheads. Because they’re flexible, they can bow or crack if not supported properly around these holes, which is why factory templates or trim rings are often used.
- Mounting Method: Acrylic panels are typically installed directly over the waterproof backing like green board or cement board using a polyurethane-based adhesive (e.g., Loctite PL 550 or Liquid Nails Fuze*It). Some systems, like Kohler Choreograph, come with snap-fit installation brackets or clip rails that fasten into studs. (some systems even allow them to go over old tile if it's in good shape).
Fastening Specs:
- Most panels have pre-scored back flanges that align flush to studs or shims
- Corner seams are blended and sealed using 100% silicone caulk, rated for wet locations (ASTM C920 compliant)
Most systems come in 3-panel kits: a back wall and two side panels that meet cleanly in the corners.
If you're doing a full acrylic shower system (including base + walls), everything fits together like a jigsaw—tight, seamless, and water-tight.
Most of the homeowners we work with in Plainville, Farmington, and New Britain go with acrylic because they want something fast, functional, and clean-looking. It’s the go-to option for 1-2 day remodels.
Why people love them:
- Zero grout = zero mildew battles
- Acrylic panels come in tons of style options (tile look, marble finish, even stone textures)
- Fast, affordable installation
- Perfect for tub-to-shower conversions
- Available in kits or custom-fitted for tricky layouts
Total Bath Systems Tip:
We carry premium acrylic systems that don’t just mimic tile—they outperform it in functionality. And yes, we can install them in as little as one day.
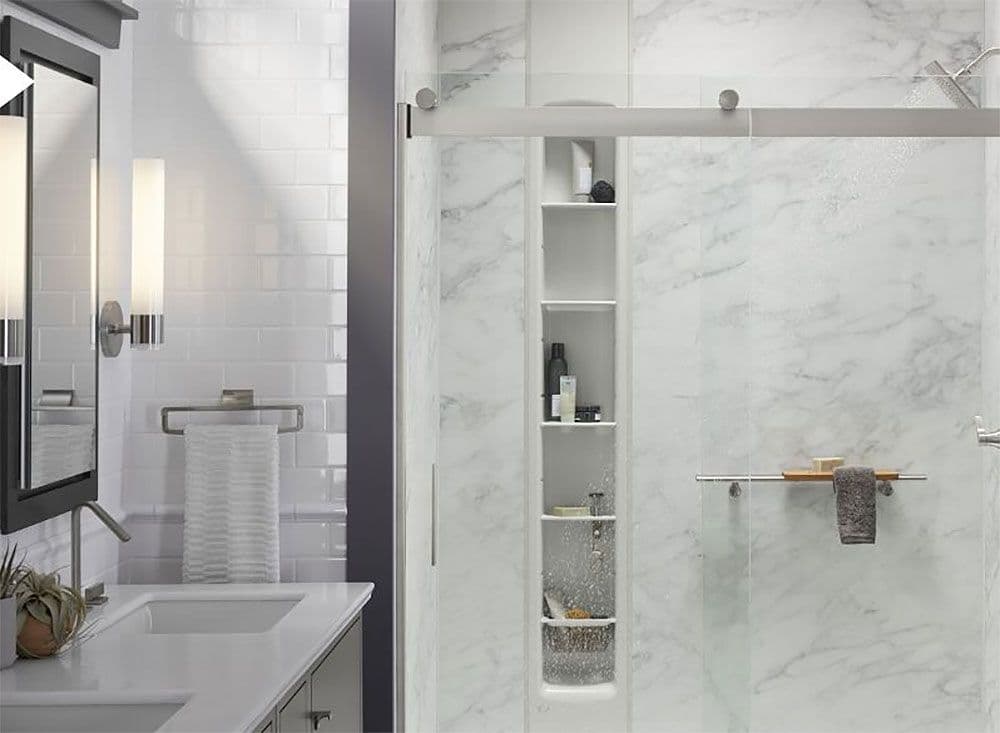
Solid Surface or Cultured Marble Panels
If you want that stone look but can’t stomach the tile upkeep, cultured marble or solid surface panels might just be your new best friend.
These wall panels are engineered from crushed stone and resin, then molded into large slabs. The result? A beautiful, seamless wall system with the elegance of stone and the ease of acrylic.
They usually have integrated corner returns and soap dishes built in, making the final product look like one smooth slab of marble.
Mounting Method:
Solid surface panels are installed similarly to acrylic, but these heavier panels (e.g., Swanstone, Onyx Collection, or custom cultured marble) require more precise anchoring are adhered with specialty adhesives like silicone-based construction sealants or epoxy.
Some panels come with integrated mounting flanges that are screwed to studs or mechanical clips that allow for vertical adjustment and reinforced mounting. (covered with decorative caps or trim for a clean look).
Weight Support Considerations:
- Solid surface panels can weigh 40–100 lbs each depending on dimensions
- Must be installed on plumb walls with blocking to prevent bowing or stress fractures
- Often requires two-installers to handle
Fixture Openings:
Factory-cut openings are recommended for precise plumbing alignment. Panels can crack under tension if holes are drilled post-installation without support.
Perks include:
- Virtually no seams or grout lines
- A luxury finish that mimics marble or granite
- Highly durable and stain-resistant
- Can be paired with matching shower pans
Best for:
- Primary bathrooms
- Upscale remodels
- Homeowners who love the look of natural stone but not the price or maintenance
They are heavier and a bit more expensive to install than acrylic—but less fussy than custom tile.
In Connecticut homes, these are especially popular in ranch-style homes or new builds where people want a sleek, unified look from floor to ceiling.
Ceramic & Porcelain Tile
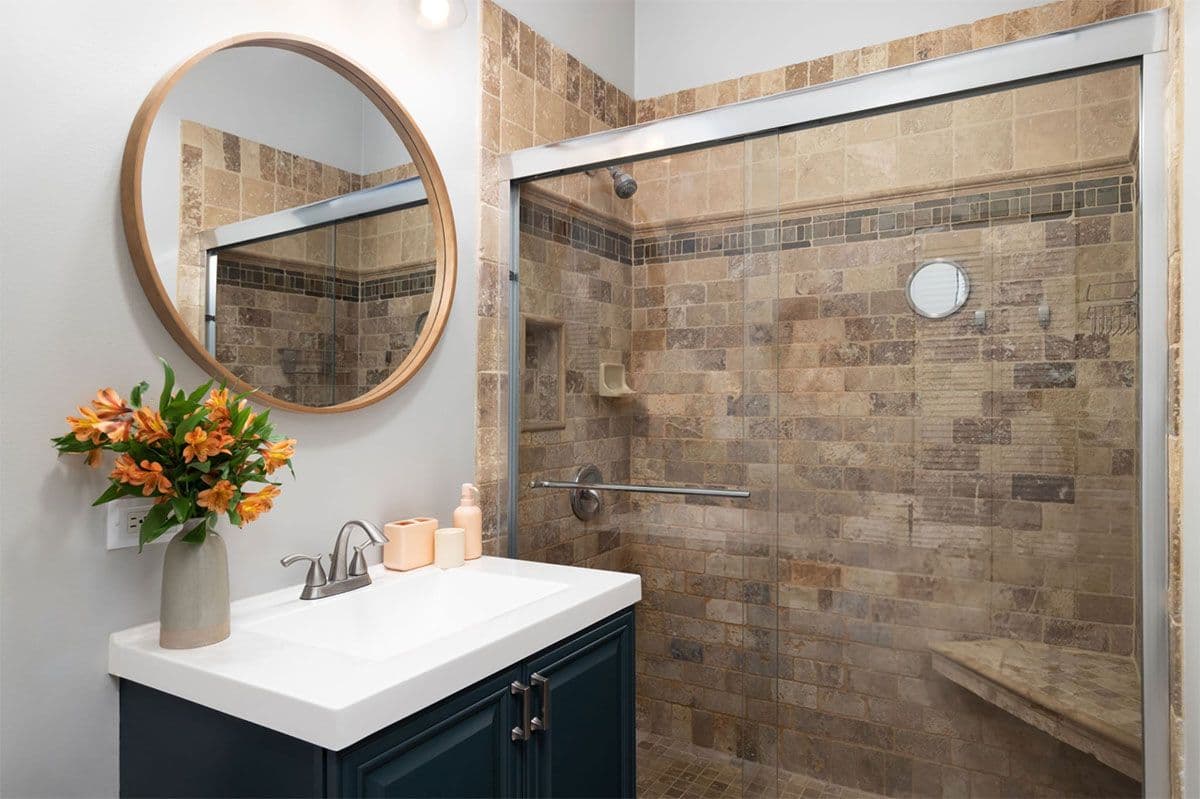
Now we’re talking style. Tile has been the gold standard in bathrooms for decades—and for good reason.
Want subway tile? Easy. Dreaming of a dramatic mosaic accent wall? You got it. From bold patterns to natural textures, tile gives you endless design freedom.
Tile walls are great for adding value to your home and achieving that spa-like aesthetic.
What to know:
- Grout = maintenance. Mold and mildew can settle into grout lines, especially in humid environments. Regular sealing and cleaning is a must.
- Tile installation requires time, precision, and skill. This isn’t a one-day job.
- Not all tiles are equal—some are more porous, others less slip-resistant.
Use cases we love:
- Historic or character homes
- High-end master bathroom remodels
- Accent walls mixed with solid panels (for style and convenience)
Mounting & Installation
Installing tile is a bit of an art form, and it starts with the right underlayment.
- First, we install cement board or a waterproof foam backer system or liquid-applied membrane (like RedGard) or a sheet membrane system like Schluter’s KERDI over the studs.
- All seams are sealed and waterproofed, often with mesh tape and a waterproof membrane.
- Then, using thin-set mortar, we lay tiles one-by-one on the walls, working from the bottom up.
- After drying, the entire wall is grouted, and the grout is sealed to prevent moisture intrusion.
The kicker? Tile is only as good as the waterproofing behind it. Tile and grout look waterproof, but they’re actually porous—so they need a fully sealed backer board to stop moisture from seeping through.
Tile also takes longer to install and cure. A typical tiled shower wall installation may span 2–3 days, including drying time.
Fixture Openings:
Because tile doesn’t flex, plumbing openings must be precise. We often use hole saws with diamond bits to drill through porcelain or stone tiles for shower heads and mixing valves. Improper cuts can cause stress cracks over time.
Cost-wise? Expect a tile shower to be more labor-intensive and pricier than acrylic. But it pays off in looks and resale value.
Total Bath Systems Pro Insight:
We handle custom tile showers from design to waterproofing and installation—so you get the beauty without the common pitfalls like leaks or uneven surfaces.
Plumbing & Fixture Integration: What Homeowners Should Ask
If you're replacing an old tub with a new walk-in shower, your existing plumbing rough-ins might not align with your new fixtures—or your new wall materials. Here are a few technical details to consider:
- Shower valve depth must match the wall thickness. A tile wall with backer board may need a deep-set mixing valve to account for the added thickness.
- Acrylic or solid surface walls are thinner—standard valves usually align perfectly if installed properly.
- Wall panels must have trim kits that accommodate material thickness and ensure water-tight seals.
Pro Tip from Total Bath Systems:
We check stud depth, valve extensions, and wall thickness tolerances before installation day. That way, you’re not stuck trying to force a Delta valve into a 1.5-inch offset with no wiggle room.
Summary: What Shower Wall Specs Should Matter to a Homeowner?
If you're choosing a shower wall system, here’s what’s worth asking about:
- Wall Thickness- Affects valve alignment, support, and thermal expansion
- Waterproof Rating- Prevents mold and drywall damage behind the walls
- Heat Tolerance- Important for steam showers or radiant heat bathrooms
- Impact Resistance- Especially in homes with kids or rental units
- Fixture Compatibility- Ensures clean, leak-free installs around valves & heads
- Warranty Coverage- Factory warranties range from 1 year (basic) to lifetime
Final Thoughts: Walls That Last, Built the Right Way

It’s not just about picking what looks good—it’s about what works with your home’s structure, plumbing, and long-term goals. Whether it’s a one-day acrylic install or a fully customized tile project with stone accents, what happens behind the wall matters just as much as what you see on the surface.
At Total Bath Systems, we help you plan from the studs out. Every measurement. Every valve placement. Every fastener. All designed to give you a walk-in shower that’s stunning, safe, and built to perform for decades.
Want a detailed quote tailored to your space? Click here to schedule a free in-home consultation.
🔜 Up Next: Part 3 – Shower Doors & Enclosures
In Part 3 of our series, we’re diving into shower doors and glass enclosures—frameless vs. framed, sliding vs. hinged, and how to choose the right glass type and configuration for your space. Plus, we’ll show you how the right enclosure pulls your whole shower design together.
Spoiler: Frameless glass might not be the slam-dunk you think it is… 👀
Red, White, & Remodel Deals!
Up to $1500 Off Etched Acrylic or PuroStone!
View all our offers here.
* see below for offer details
Project Inspiration
Materials and Workmanship
As a Home Deport Certified Partner & Installer, we believe that quality in materials and labor are the keys to a successful bath shower remodel.

